Bitwarden Setup & Usage Guide for Individual Users
Table of Contents
- Introduction
- Account Setup
- Master Password Best Practices
- Importing Existing Passwords
- Creating and Managing Logins (Desktop & Browser)
- Creating and Managing Logins (Mobile)
- Using Passkeys
- Additional Security & Best Practices
- Video & Learning Resources
- Conclusion
Introduction
Bitwarden is an open‑source password manager that keeps your login credentials, payment cards and secure notes encrypted on all your devices. It supports features such as strong password generation, secure sharing, import/export, and modern passkey authentication. This guide replaces the previous Bitwarden in‑depth guide and is based on the latest official Bitwarden documentation, ensuring that every step is accurate and up‑to‑date.
Account Setup
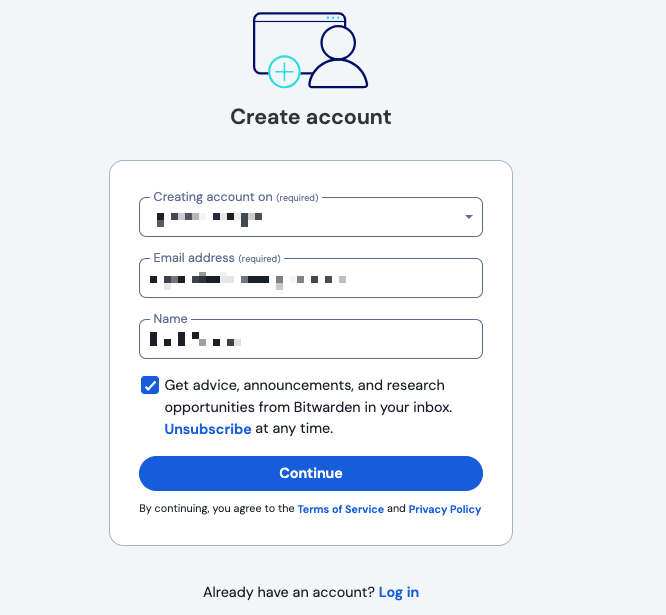
- Start from the official site. Go to bitwarden.com and select Get Started or open the sign‑up page directly. You can create your account on Bitwarden’s U.S. or EU servers (or choose a self‑hosted instance). Select the desired server region from the Creating account on drop‑down bitwarden.com.
- Enter your email and domain. Fill in your email address and optionally your name, then pick the server region. The sign‑up form looks like this:
- Verify your email. After clicking Continue, Bitwarden sends a verification link to your inbox. Follow the link to confirm your email and proceed to create a master password bitwarden.com.
- Set a strong master password. Bitwarden requires at least a 12‑character master password bitwarden.com. Use a long, unique phrase or random word sequence (more on this in the next section). You can set an optional password hint that Bitwarden can email to you if you ever forget your master password. The master‑password screen reminds you that Bitwarden cannot recover forgotten passwords:

- Complete account creation. Once you confirm the master password, Bitwarden finalizes your account. If you were invited to an organization, open the emailed invitation and select Join Organization Now to link your account bitwarden.com.
Master Password Best Practices
Your master password secures your entire vault, so it should be memorable, unique, and difficult to guess:
- Use a passphrase. Bitwarden recommends a long phrase of four or more random words, numbers and symbols bitwarden.com. Song lyrics or memorable sentences can be transformed into secure passphrases (for example, “Take the dog for a walk at 9pm!” becomes “TakeDogWalk9pm!”). Longer phrases dramatically increase cracking time bitwarden.com.
- Make it unique. Do not reuse a password from any other service bitwarden.com. Bitwarden cannot reset your master password; if you forget it, you lose access to your vault bitwarden.com.
- Length matters. Starting in 2023, Bitwarden requires a 12‑character minimum bitwarden.com. Longer passphrases (16+ characters) provide stronger protection.
- Record your password safely. Consider writing the passphrase on paper and storing it securely bitwarden.com. Avoid storing it digitally unless it’s in another secure vault.
- Enable two‑step login. Use a second factor such as Bitwarden Authenticator, TOTP apps, email or hardware security keys (see Two‑Step Login) to further protect your vault.
- Use hints and emergency access. Set a password hint or designate a trusted emergency contact so you aren’t locked out of your vaultbitwarden.com.
For extra reassurance, test your passphrase with the Bitwarden Password Strength Tester, which shows how long a brute‑force attack would take.
Importing Existing Passwords
If you have passwords stored in browsers or another manager, Bitwarden makes it easy to import them into your vault:
- Open the web vault. Log in to vault.bitwarden.com or your chosen server.
- Navigate to Tools → Import Data. In the web app, go to Tools then Import data bitwarden.com.
- Select your import destination. Choose whether to import into your personal vault or an organization collection (if applicable), and select a folder where new items will be stored bitwarden.com.
- Choose the file format. Bitwarden supports CSV and JSON files exported from most password managers and browsers. Select the correct format from the drop‑down list.
- Upload your file. Click Choose file and select your exported password file. Imports of up to 40,000 items are supported for personal vaults bitwarden.com. Note that duplicate entries may be created if the same credential already exists.
- Import and clean up. Click Import data to finish. Bitwarden advises deleting the import file afterwards to prevent accidental exposure bitwarden.com.
Tip: Bitwarden offers specialized import guides for common services (LastPass, 1Password, Dashlane, Chrome/Firefox, etc.) bitwarden.com. These guides walk you through exporting from the old manager and mapping fields correctly.
Importing through the mobile apps is not supported; perform imports from the web vault.
Creating and Managing Logins (Desktop & Browser)
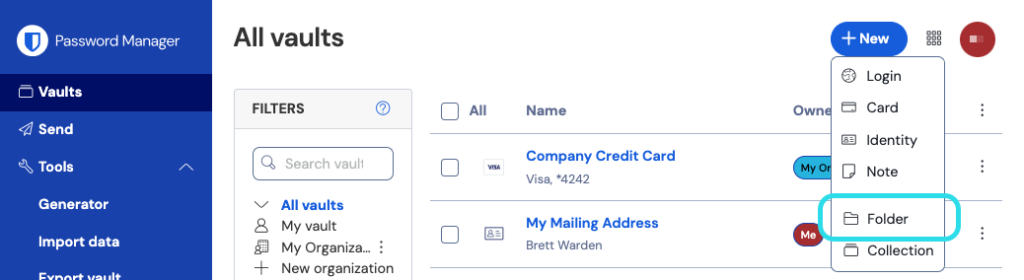
Create a Folder
Organizing entries into folders makes them easy to find later. In the web app:
- Select the + New button and choose Folder bitwarden.com.
- Enter a descriptive name (for example, Social Media) and click Save. You can nest folders inside each other for additional organization bitwarden.com.
Add a Login
- Click + New and choose Login bitwarden.com.
- Enter a recognizable Item name and select the folder you just created.
- Provide your Username and current Password. For now, enter the password you use on the website.
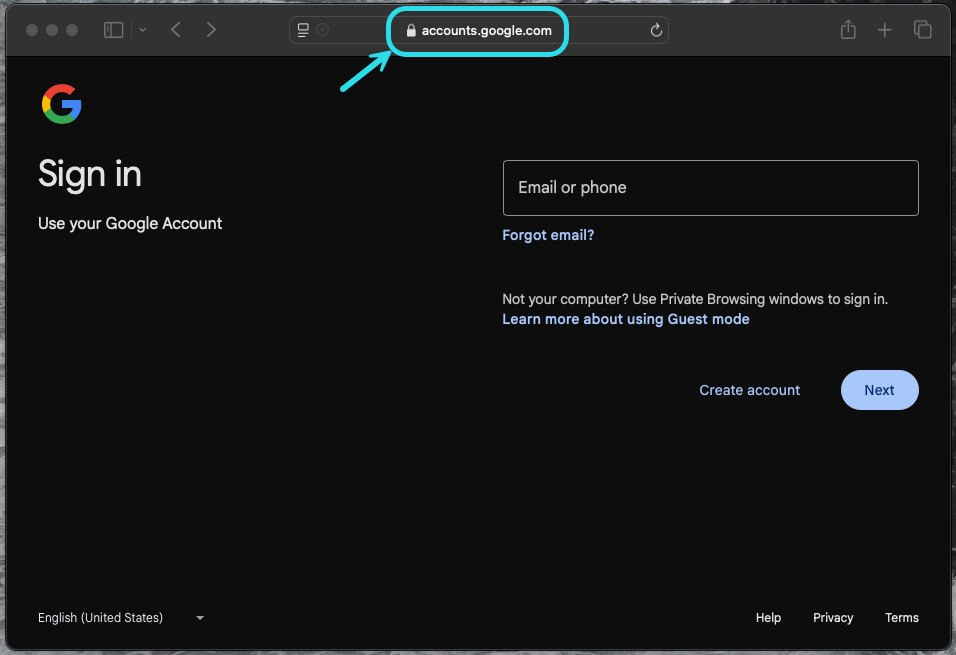
- Add the website’s address in the Website (URI) field. If you’re unsure which URL to use, navigate to the site’s login page and copy it from your address bar bitwarden.com.
- Optionally click the ⭐ icon to mark the login as a favorite, then click Save bitwarden.com.
Generate a Strong Password
After adding a login, replace the old password with a randomly generated one:
- In your vault, open the newly created login and click Edit bitwarden.com.
- In a new browser tab, log in to the website and navigate to its Change password page bitwarden.com.
- Copy your current password using the Copy icon in Bitwarden and paste it into the website’s “Current password” field bitwarden.com.
- In Bitwarden, click the Generate icon next to the Password field. Confirm that you want to overwrite the password bitwarden.com. Bitwarden will generate a random password like
X@Ln@x9J@&u@5n##B, which is far stronger than common words. bitwarden.com - Copy the new password and click Save in Bitwarden bitwarden.com, then paste it into the website’s New password and Confirm password fields to update your account bitwarden.com.
- Don’t worry about overwriting the existing password—Bitwarden keeps a Password history of the last five passwords for every login bitwarden.com.
Browser Extension Options
Bitwarden’s browser extension lets you create new logins more fluidly:
- Manual entry before account creation: Navigate to the website, open the extension, click the + button, and add a new login. Use the built‑in username generator and password generator to create strong credentials. After saving, autofill the credentials when signing up bitwarden.com.
- Autosave after account creation: Alternatively, generate a password in the extension, sign up on the website, and wait for Bitwarden’s autosave banner to appear. You can choose a folder or collection and click Save or Edit bitwarden.com.
- Edit the login afterwards to add a TOTP key, change the URI matching rule, attach files, or add notes bitwarden.com.
Creating and Managing Logins (Mobile)
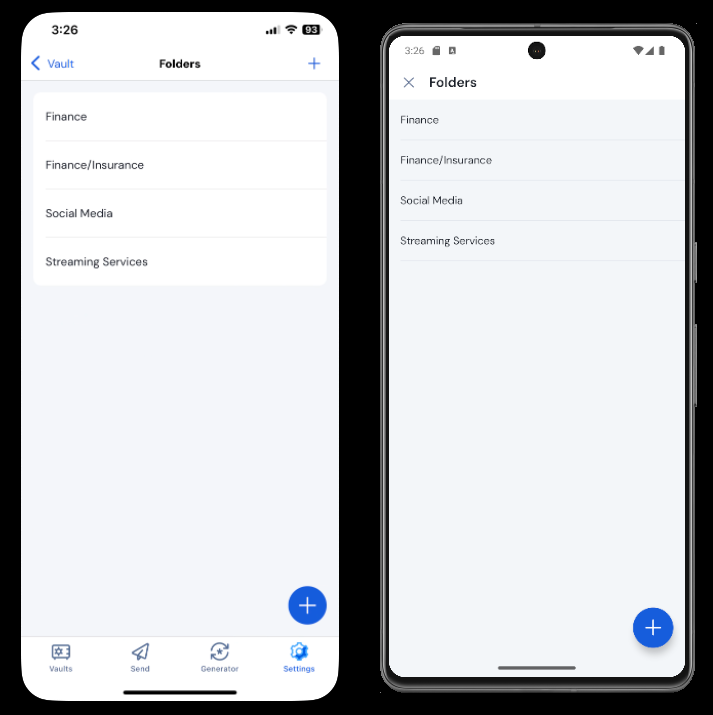
Create Folders on Mobile
- Open the Bitwarden mobile app and tap the ⚙️ Settings tab.
- Choose Vault and then Folders. Tap the Add icon, give your folder a name, and save it bitwarden.com.
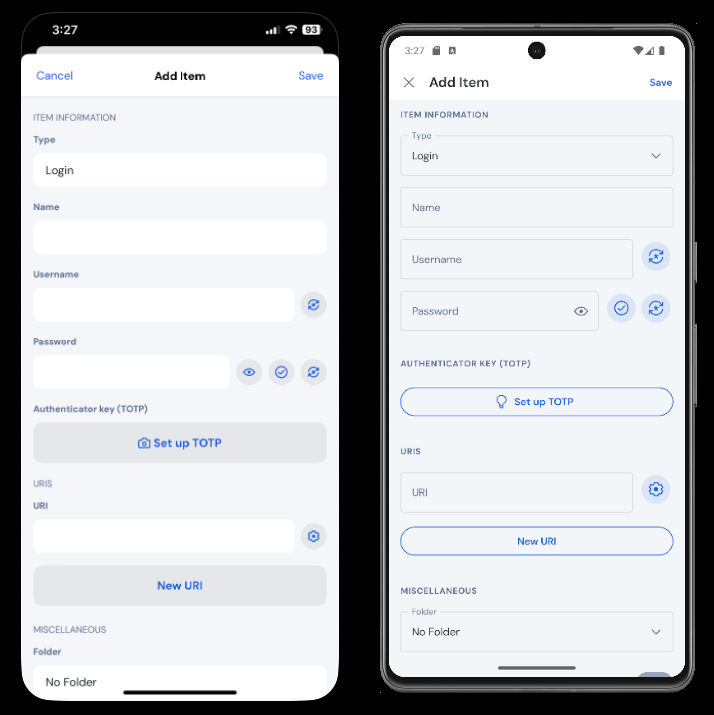
Add a Login on Mobile
- Go to the My Vault tab and select Add → Login bitwarden.com.
- Provide a Name, Username, and your existing Password. Tap New URI to add the website’s address bitwarden.com.
- Choose a folder from the Folder drop‑down (e.g., the one you just created) and tap Save bitwarden.com.
Generate a Strong Password on Mobile
- Log into the website in a browser or app and find the Change password screen bitwarden.com.
- In Bitwarden, open your login item and tap Edit (pencil icon on Android) bitwarden.com.
- Select Generate to overwrite the old password with a randomly generated one and tap Yes to confirm bitwarden.com.
- Save the item, then copy the new password from Bitwarden and paste it into the website’s New password fields bitwarden.com.
Additional Mobile Tips
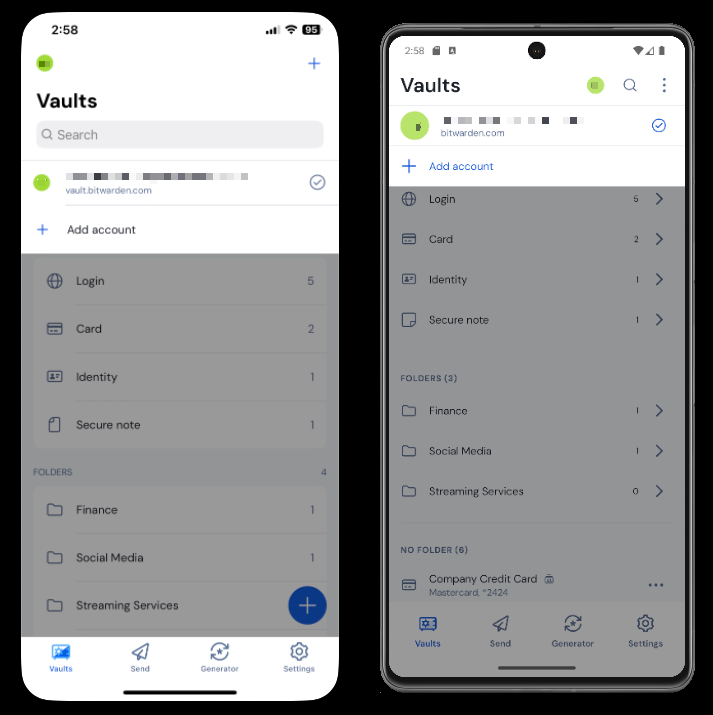
- Account switching: The mobile app lets you stay logged in to up to five accounts simultaneously. Tap your account name in the top bar and select Add Account to add another login bitwarden.com.
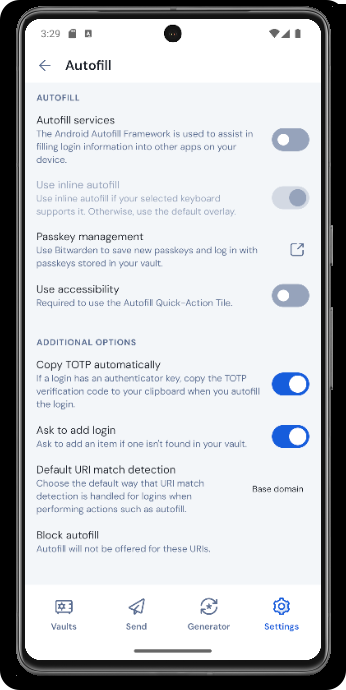
- Enable autofill: On Android, open Settings → Autofill and toggle Autofill Services to allow Bitwarden to offer credentials in other apps bitwarden.com. On iOS, enable AutoFill Passwords and Passkeys and select Bitwarden as a provider bitwarden.com.
- Launch sites from Bitwarden: Tap the Launch icon in any item with a valid URI to open the website directly bitwarden.com.

- Biometric unlock and PIN: Bitwarden allows unlocking the vault using biometrics or a PIN instead of entering your full master password each time bitwarden.com.
Using Passkeys
Passkeys are a modern alternative to passwords that provide fast, phishing‑resistant sign‑ins using public‑key cryptography. Bitwarden can store and autofill passkeys via its browser extension and mobile apps, and you can even log in to Bitwarden itself with a passkey bitwarden.com.
General Notes
- Passkeys follow the FIDO Alliance standard and are protected by Bitwarden’s end‑to‑end encryption bitwarden.com.
- iOS requires version 17.0 or later; Android requires version 14.0 or later bitwarden.com.
- Only one passkey can be stored per login item bitwarden.com.
Browser Extension
- Enable passkey prompts. In the browser extension, open Settings → Notifications and toggle Ask to save and use passkeys bitwarden.com.
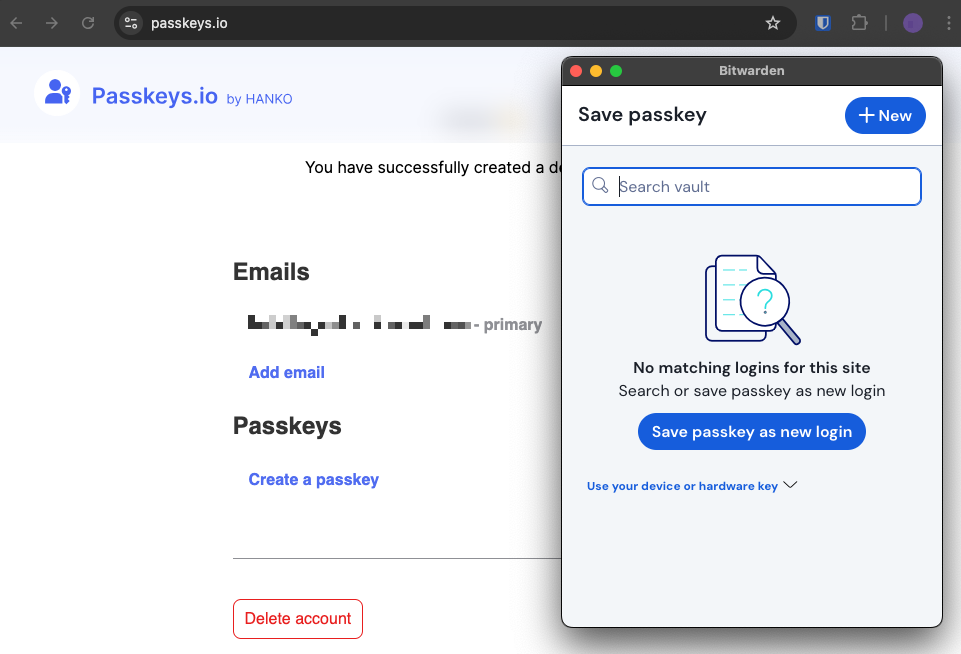
- Save a passkey when registering. When a website offers to create a passkey, Bitwarden prompts you to Save passkey. If you prefer to use a hardware key or device passkey, choose Use your device or hardware key bitwarden.com.
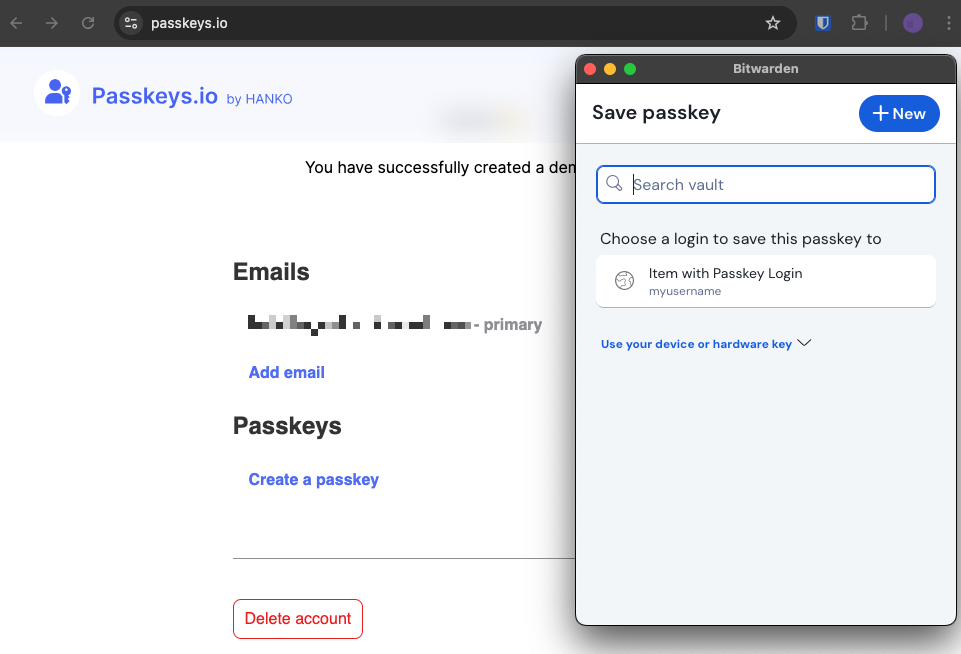
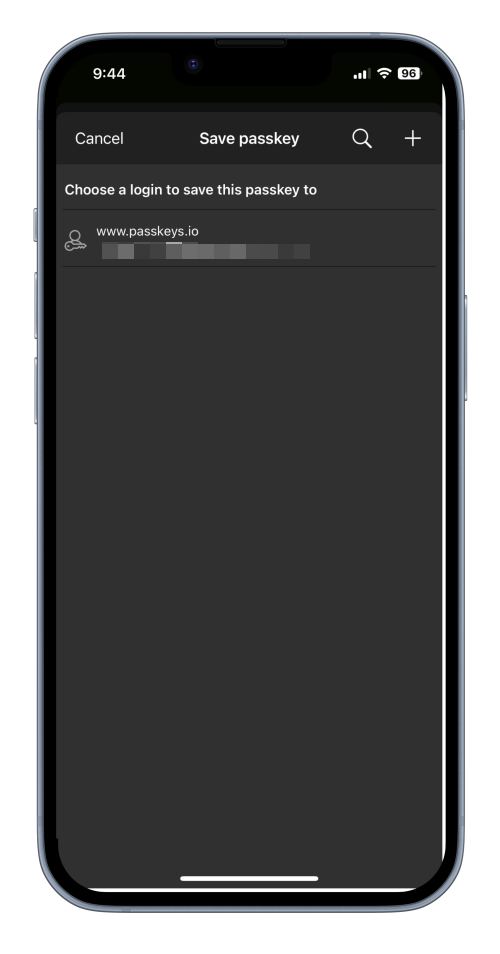
- Overwrite an existing passkey. If a passkey already exists for the site, you can create a new item or overwrite the existing one bitwarden.com.
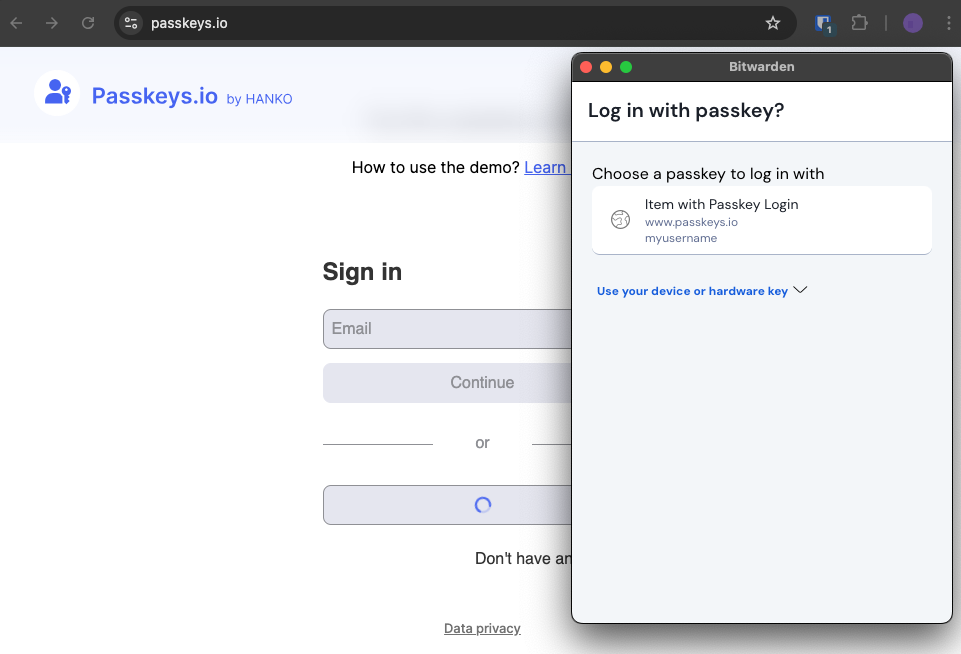
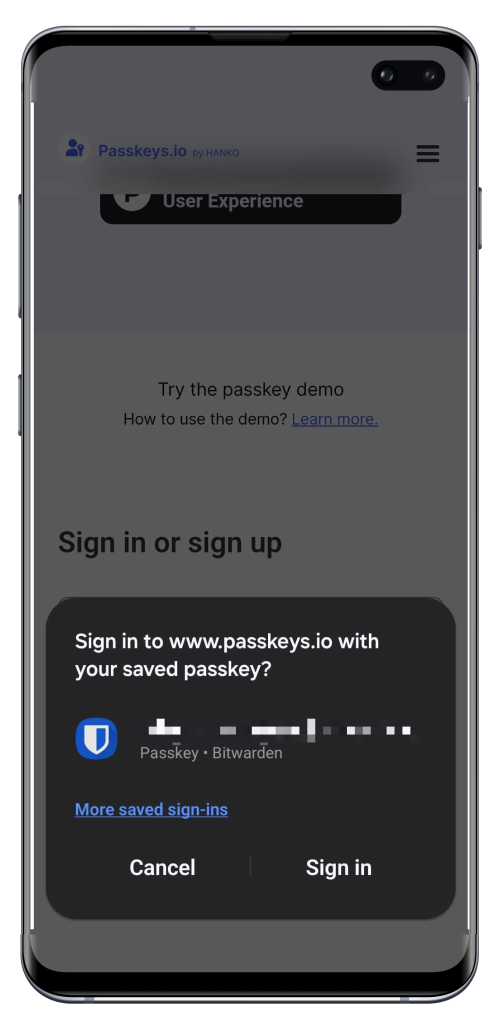
- Log in with a saved passkey. When signing in, Bitwarden offers the stored passkey in the inline autofill menu. Select it to authenticate bitwarden.com.
iOS
- Enable passkeys. On iOS, open Settings → Passwords → Password Options and toggle AutoFill Passwords and Passkeys and Bitwarden bitwarden.com.
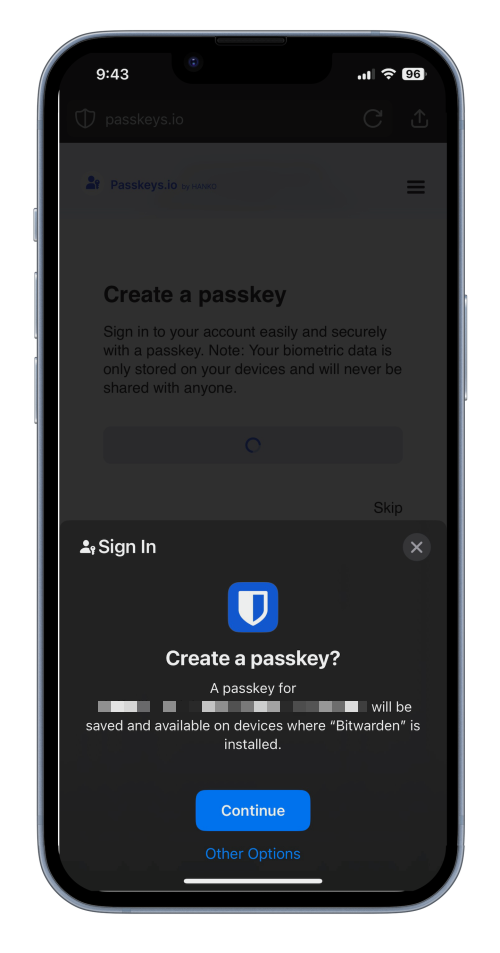
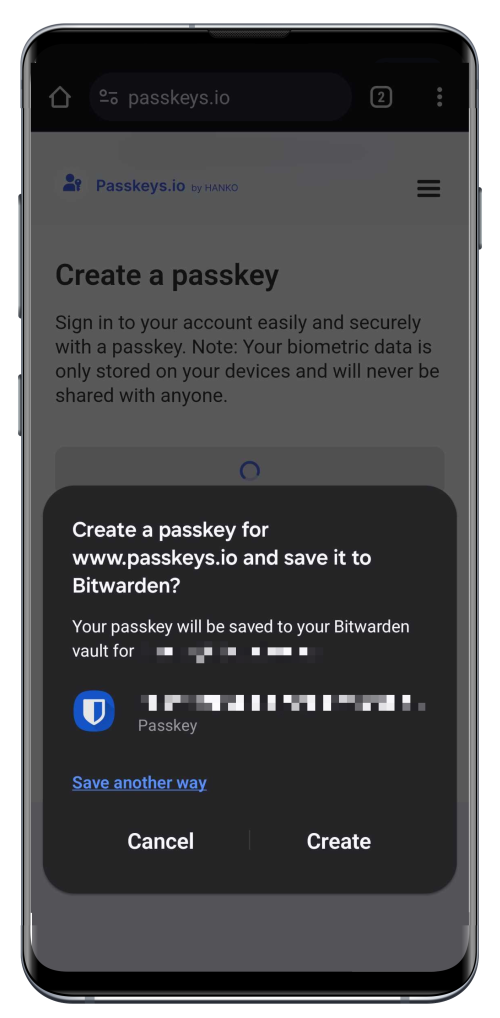
- Create a passkey. When a site prompts you to create a passkey, Bitwarden’s iOS app asks to store it bitwarden.com. Tap Continue to save.
- Overwrite an existing passkey. Bitwarden lets you choose + to create a new item or overwrite the existing passkey bitwarden.com.
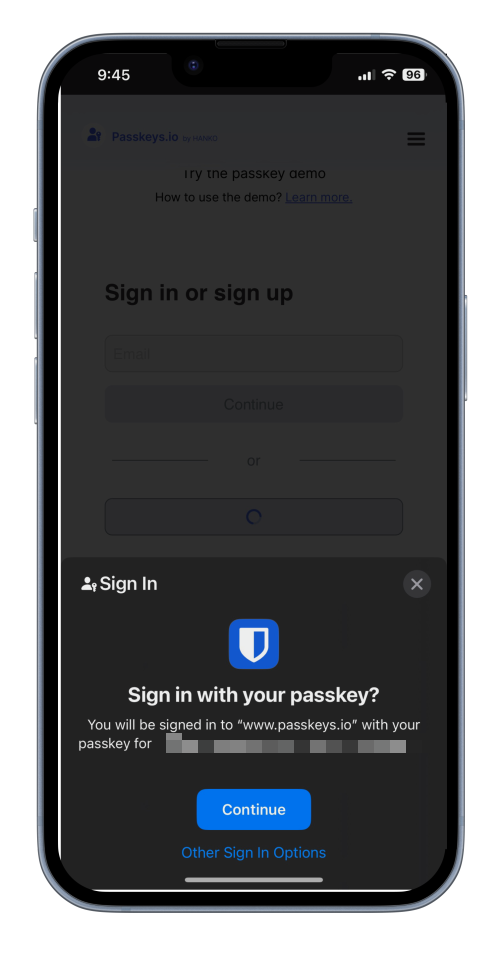
- Sign in with a passkey. When logging in, the iOS app presents stored passkeys; select one and tap Continue bitwarden.com.
Android
- Enable passkeys. After updating to the latest version, open Settings → Auto‑fill and tap Passkey management bitwarden.com.
- Create a passkey. During registration on a passkey‑enabled website, Bitwarden’s Android app offers to store the passkey bitwarden.com.
- Overwrite an existing passkey. You can create a new passkey or overwrite an existing one bitwarden.com.
- Sign in with a passkey. When signing in, select the stored passkey and tap Sign in bitwarden.com.
Viewing and Managing Passkeys
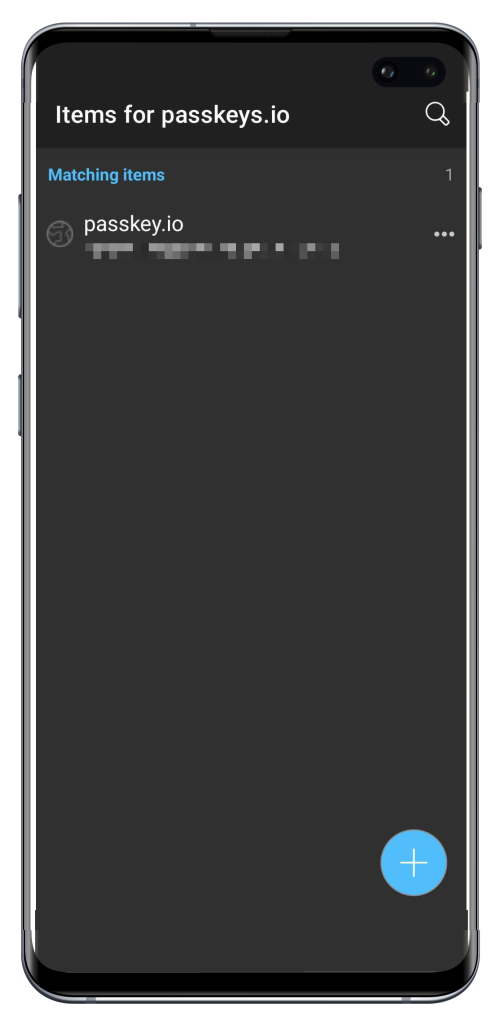
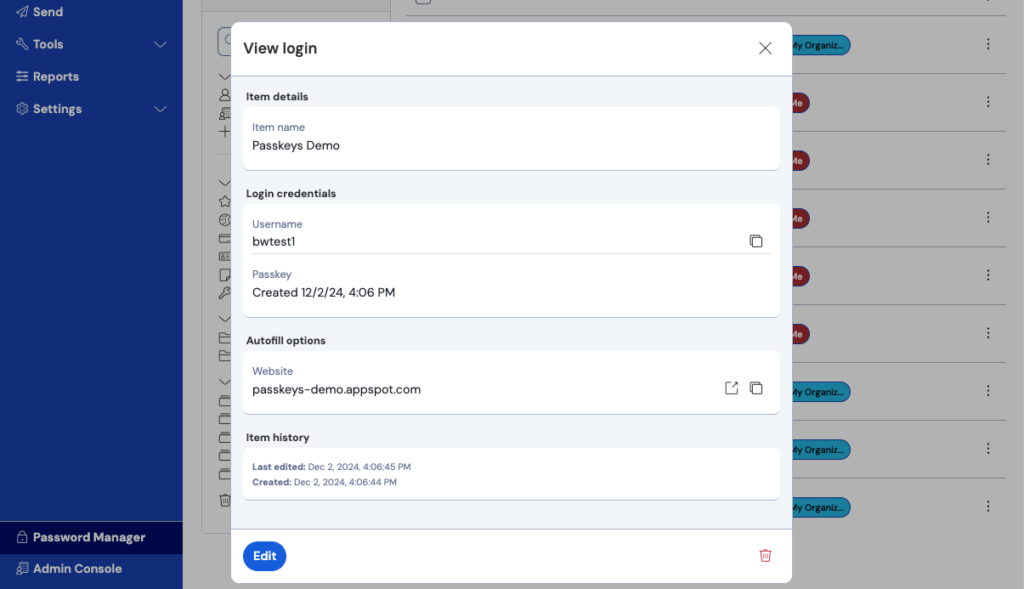
- View a passkey. In any Bitwarden app, edit the login item; the Passkey field displays the stored key bitwarden.com.
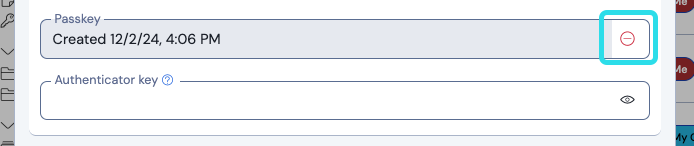
- Delete a passkey. While editing, click the – icon next to the passkey to remove it bitwarden.com.
Log in to Bitwarden with a Passkey (Passwordless Login)
Bitwarden now supports logging directly into the web vault and browser extension using passkeys. When using a compatible browser (Chromium‑based) and hardware authenticator, you can skip entering your email and master password bitwarden.com. Passkeys are used both for authentication and for deriving your encryption keys, ensuring zero‑knowledge protection bitwarden.com.
Additional Security & Best Practices
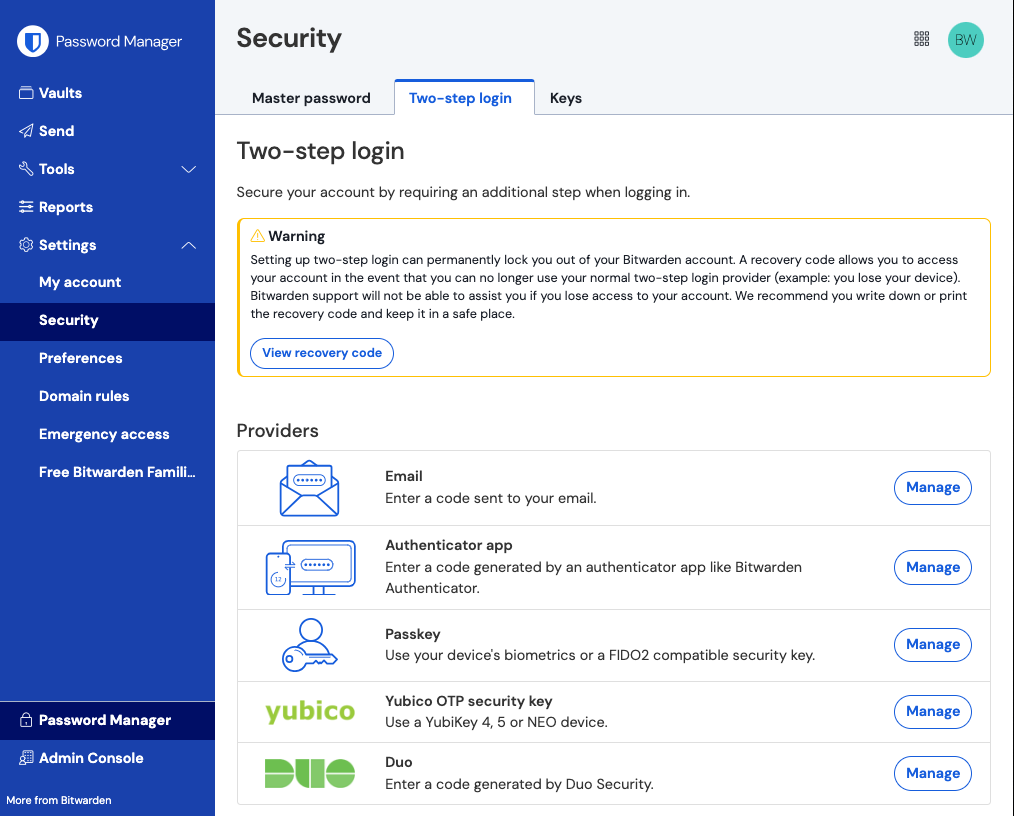
Two‑Step Login (2FA)
Enabling two‑factor authentication adds another layer of protection beyond your master password. Bitwarden supports authentication apps, email codes, Duo Security, YubiKey and passkey 2FA. The recommended method for free users is a mobile authenticator app bitwarden.com.
To set up 2FA:
- In the web app, go to Settings → Security → Two‑step login bitwarden.com.
- Select Authenticator App and click Manage bitwarden.com.
- Bitwarden will prompt you to enter your master password, then display a QR code. Scan the code with Bitwarden Authenticator or another TOTP app bitwarden.com.
- Enter the six‑digit verification code to enable 2FA and click Enable bitwarden.com.
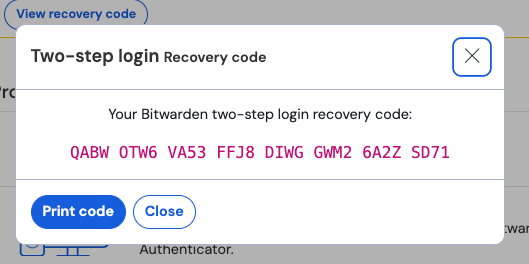
After enabling, click View Recovery Code to display a backup code. Save this code offline (for example, print it and store it securely) to regain access if you lose your authenticator device bitwarden.com.
Additional Tips
- Unlock options: Set up biometrics or a PIN to unlock Bitwarden quickly while still protecting your vault bitwarden.com.
- Integrated authenticator: Bitwarden can generate one‑time passcodes (TOTP) for your logins directly in the vault, eliminating the need for a separate authentication app bitwarden.com.
- Regular vault audits: Use Bitwarden’s Vault Health Reports (premium feature) to identify reused, weak or exposed passwords and update them regularly.
- Emergency access: Premium users can set up trusted emergency contacts who can request access to your vault if something happens to you bitwarden.com.
Video & Learning Resources
Bitwarden provides free learning modules to help you master the password manager:
- Bitwarden Personal User Course: This bite‑sized course includes short videos on signing up, getting to know the vault, importing data, using the browser extension, autofill and mobile apps. You can access the course here: bitwarden.com/help/courses/password-manager-personal bitwarden.com. Each section includes a video (1–4 minutes) and written instructions.
- Passkey FAQs and demos: For more information about passkeys, see Bitwarden’s passkey FAQ page and the autofill passkeys documentation bitwarden.com.
- Password Strength Tester: Test your proposed master password using the password strength tool bitwarden.com.
Conclusion
By following this guide, you’ve created a secure Bitwarden account, built a strong master password, imported existing credentials, organized your vault, generated strong passwords for new and existing logins, and learned how to use modern passkeys. You’ve also explored essential security features like two‑factor authentication and recovery codes. For continued learning, explore Bitwarden’s courses and documentation, and stay informed about new features like passwordless logins. With Bitwarden, you can confidently manage your digital life while keeping your data safe.
Why Choose DarkHorse IT?
We combine enterprise tools with a personal approach. We explain things in everyday language, we care about our clients, and we’re local. Whether you run a business or want your home devices to stay secure and reliable, we’re here to help.
Visit our website at https://darkhorseit.com
Read more KFGO tech posts at https://kfgo.darkhorseit.com
Watch the Thursday segment live on Facebook at https://www.facebook.com/darkhorseit
Liked this post? Follow this blog to get more.
Leave a Reply